|
From the Patients window, you can use the search bar to search for patient records, select patients for use in axiUm, and add or remove patient names from the selection list.
 Search for Patient Records Search for Patient Records
You can use the search bar to search for patients by name, chart number, or other customized columns.
Note: Searches are not case sensitive.
Search results can appear as one of two record types:
- Patients: They have a chart number, clinical and financial records, and can be scheduled for appointments. They display a checkmark next to their name in the search results.
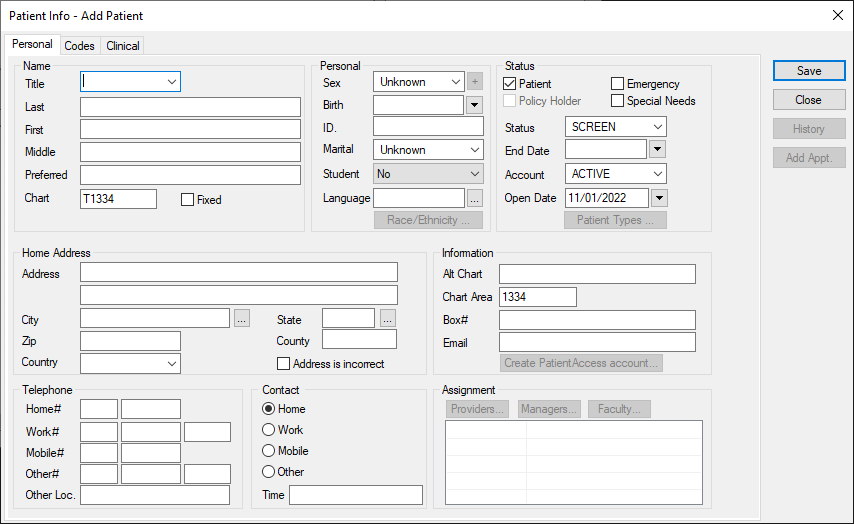
Note: Newly created records are automatically set as patients if the Personal tab > Patient checkbox is selected when the patient record is created.
- Non-patients: They cannot be booked for appointments or have treatments created for them. They display an empty checkbox next to their name in the search results.
To search for a patient:
- Open the Patients module and enter the search criteria in the search bar.
| Name
|
Enter the name and press Enter.
- For exact matches, enter the full name.
Example: mathers, jim
- For last name matches, enter the full name or starting letters.
Examples: mathers or ma
- For partial last / first name results, enter the first letters of each.
Example: ma, j
- For first or preferred name results, enter the name.
Example: jim
Tip: If searching for a common name, use unique criteria.
|
| Chart Number
|
Enter the number and press Enter.
Tip: You can also enter the starting letter and click the Chart # column header.
|
| Other common customized columns include: |
| Mobile Phone / Phone #
|
Enter the number, click the Phone column heading, and select Search on Mobile Phone or Search on all phone numbers.
Note: Do not include the area code in your search.
Example: To find 212-344-4545, enter 344-4545 or 344-4.
|
| Birthdate
|
Enter the date and click the BirthDate column heading.
Note: The required date format is based on your institution but you can use either a dash (-) or slash (/) as the separator.
|
- Review the patient search results.
Select Patients
You must select a patient to complete many (most) activities in axiUm.
When you select a patient:
- Their basic details display in the Patients window > patient information area and you can open the Patient Card window to display all detailed patient information.
- Their name and chart number also appear in the status bar.

- Other modules display the patient’s specific information, when opened.
Example: If the Case Management module is opened, the window displays that patient’s cases, forms, Tx History, etc.
Note: The fields you see in the patient information area depend on your institution’s axiUm configuration. For a description of the fields that modify the patient information area, see Customize Patients.
There are a variety of ways to select a patient in axiUm. Some of the more common ways include:
- From the Patients window > search results.
- From the Patients window > selection list.
To select a patient:
- Open the Patients window and review the selection list.
- If the patient is present in the list, click the patient to select the patient.
- If the patient isn’t present in the list, search for the patient.
- From the search results, click the patient to select the patient.
Note: From the menu bar, you can also click Patient > Select Patients to select a patient.
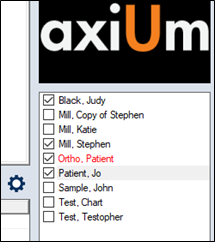
Use the Patient Selection List
The selection list serves as a list of patients you can quickly access to save time and avoid repeatedly searching for patients.
Note: Depending on your role and institution, your selection list may pre-populate each day with patients that have scheduled appointments.
- Open the Patients module and search for a patient.
- Complete any of the following:
Add Patients to the List
- From the search results, complete any of the following:
- Right-click the patient and click Select.
- Double-click the patient.
Note: If an overnight process is set up, the patient remains in the selection list until the overnight process clears it or you can clear it manually.
- (Optional) To lock the patient in the selection list and prevent overnight removal, select the checkbox next to the patient.
Note: This checkbox differs from the checkbox in the search results that indicates if this is a patient.
Remove Patients from the List
- If the patient’s checkbox is selected, deselect the checkbox.
- Right-click the patient and select Deselect.
The patient disappears from the selection list.
Tip: To remove multiple patients at once, deselect all necessary patient checkboxes, right-click, and select Deselect All.
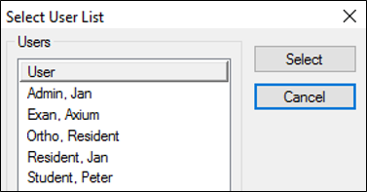
View Another User’s Selection List
Depending on your role, you may need to view or work from another user’s selection list.
- From the selection list, right-click and select User List to display the Select User List window.
- Select a name from the list and click Select.
Your selection list is replaced with the other user’s list.
- To return to your view, repeat the steps and select your name from the list.
View Patient Records
(Aside from the patient information area, the Patients module offers two detailed levels to view and maintain patient information –the Patient Card and Patient Info windows.
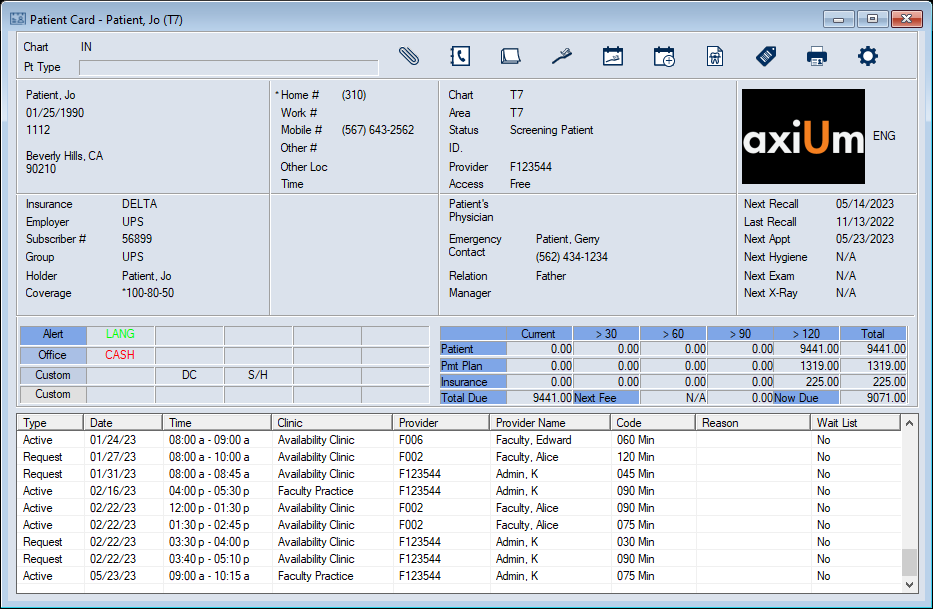
View the Patient Card Window
- Open the Patients module and select a patient.
- From the toolbar, click the Patient Card (
 ) icon to display the Patient Card window. ) icon to display the Patient Card window.
- Review the patient information as necessary.
- (Optional) Click an area in the Patient Card window to open the Patient Info window to the corresponding tab.
- (Optional) Click a toolbar icon to display and view the applicable window.
|